SOP по очистке и парковке экосольвентных принтеров: защита от засыхания дюз в сухом климате
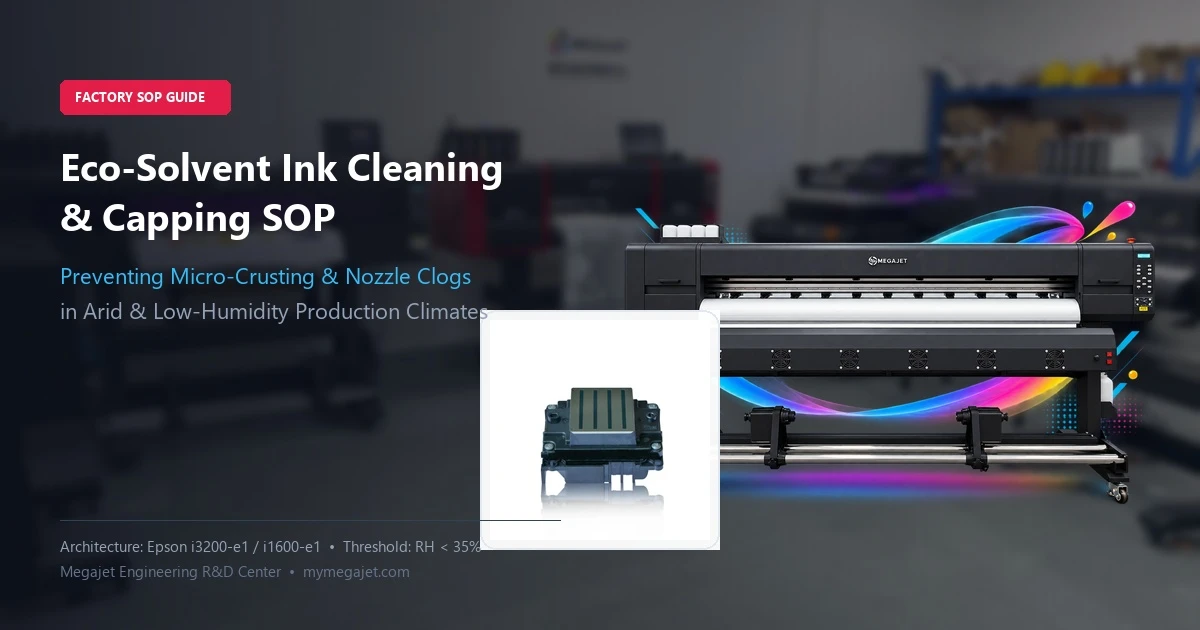
Precision eco-solvent capping station maintenance and nozzle protection protocol.
Table of Contents
Operating commercial eco-solvent inkjet printers in arid regions presents severe chemical and physical challenges that standard user manuals never address. Whether running wide-format graphic production across desert territories in the Middle East, Central Asia, and North Africa, or managing print shops in North America and Northern Europe where winter central heating drops indoor relative humidity below 25%, printhead drying is the primary cause of downtime. At our manufacturing facility, where we build high-precision commercial eco-solvent printers and industrial roll-to-roll equipment, our technical support engineers regularly diagnose printhead dropouts reported by overseas distributors. In more than 80% of these cases, the root problem is not electrical failure or sub-standard pigment quality. It is the rapid evaporation of carrier solvents at the microscopic nozzle meniscus, compounded by incorrect cleaning habits like dry wiping and uncontrolled power suction.
Factory Boundary Statement: Megajet specializes strictly in micro-piezo Eco-Solvent, UV flatbed/roll-to-roll, and textile DTF printing machinery. Megajet does not manufacture heavy industrial full-solvent grand-format printers running aggressive aromatic solvents. The cleaning and capping protocols documented below are engineered for Epson high-density micro-piezo printhead platforms running eco-solvent inks — the commonly used i3200-e1, i1600-e1, XP600, DX5/DX6/DX7 and more — and do not apply to aggressive full-solvent industrial printheads.
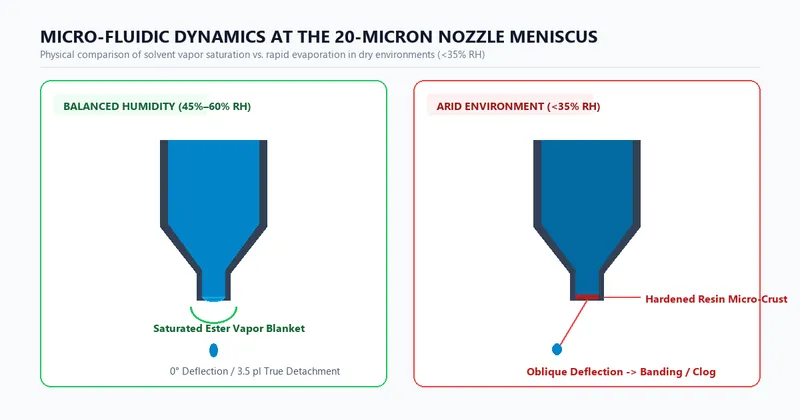
To maintain clean drop ejection, an inkjet operator must understand the fluid dynamics occurring at the 20-micron nozzle opening. Commercial eco-solvent inks utilize high-boiling-point ester solvents—primarily 2-Butoxyethyl Acetate (accounting for 70%–85% of the liquid carrier) paired with propylene glycol ether acetates (PMA) and trace active resin penetrants such as 1-Methyl-2-pyrrolidinone (NMP). In a balanced workshop held at 40%–60% relative humidity (RH) and 20°C–25°C, volatile carrier molecules evaporating from the nozzle meniscus create a saturated microscopic vapor layer directly outside the orifice. This vapor shield prevents the underlying ink inside the nozzle chamber from skinning over during standard carriage scan delays. The architecture reference for the micro-piezo head family discussed below — nozzle count, row configuration and firing frequency — follows the specifications Epson publishes for its I-Series PrecisionCore printheads, while the recommended environment range above matches what independent eco-solvent maintenance guides give for stable pigment-dispersion printing. When ambient relative humidity plunges below 35%, this vapor shield evaporates into the dry surrounding air almost instantly. Under these arid conditions, three destructive reactions happen in sequence:
- Micro-Meniscus Skinning (微结皮反应): Within 60 to 120 seconds of carriage idle or unspitted motion, the high-boiling ester carrier evaporates at the exposed liquid surface. The dissolved acrylic resins rapidly cross-link, trapping pigment nanoparticles into an elastic surface membrane—often called a "micro-crust."
- Deflection Before Total Clog (斜喷与拉丝): When the piezoelectric actuator fires at 21.6 kHz, the microscopic pressure wave cannot break through this elastic skin symmetrically. The expelled 3.5 pl ink droplet deflects at an oblique angle, causing fine banding, blurry text edges, and graininess across solid color passes.
- Cavitation and Complete Channel Loss (气蚀与彻底断线): If the meniscus dries completely, the dried crust plugs the 20-micron orifice. Subsequent firing pulses generate negative vacuum reflection waves inside the chamber, drawing air bubbles through adjacent fluid channels. This induces acoustic cavitation, extinguishing firing across entire nozzle rows.
A major mistake made in sign shops is treating all clear maintenance liquids as identical. Using aggressive solvent flush when mild moisturizing fluid is required will destroy an Epson i3200-e1 printhead within weeks.
| Maintenance Liquid Type | Primary Chemical Compounds | Intended Function | Critical Safety Boundary |
|---|---|---|---|
| Eco-Solvent Active Flush (清洗液) | 2-Butoxyethyl Acetate (>80%), PMA (<10%), NMP (<5%) | Dissolving cured resin clogs, flushing sub-tanks, line purging | Never soak printhead for >30 minutes; dissolves internal epoxy glues |
| Moisturizing / Capping Fluid (封头保湿液) | Diethylene glycol monoethyl ether, low-volatility polyols | Daily cap sponge saturation, maintaining 100% micro-vapor seal | Safe for indefinite contact; does not dissolve internal structural adhesives |
Physical Maintenance Supplies: What to Use and What to Ban
PrecisionCore printheads feature an ultra-thin fluorine-based oleophobic coating on the polished nozzle plate. This coating ensures that wet ink droplets bead up and slide off cleanly rather than pooling around nozzle exits. Using improper mechanical tools will scratch this coating permanently.
- Approved Tool: Class 100 Cleanroom Polyurethane Foam Swabs (100% thermally bonded foam, zero glues, zero fibers). The soft rectangular foam head conforms to the metal skirt without shedding.
- Strictly Banned Tool: Standard cotton buds or medical Q-tips. Cellulose fibers instantly snag on the microscopic sharp edges of the 3,200 nozzle orifices, creating capillary wicks that bleed ink continuously and cause irrecoverable air entry.
- Wiper Blade Maintenance: Ensure your printer is fitted with solvent-resistant polyurethane or FKM rubber wipers. In dry rooms, an untreated wiper blade dries into a stiff plastic blade that physically scratches the nozzle faceplate like fine sandpaper.
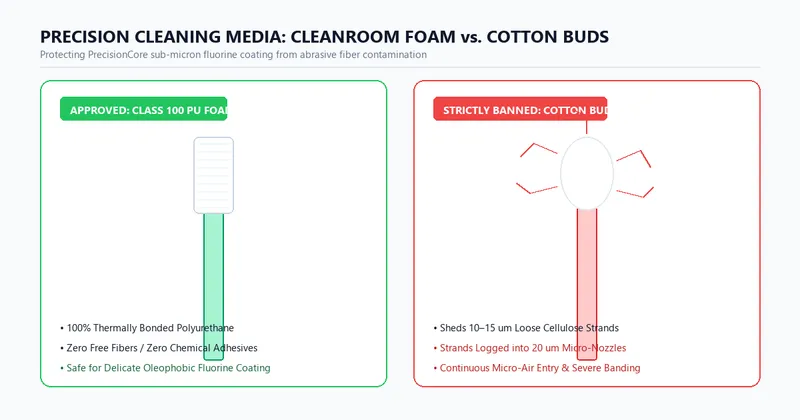
Comparison between cleanroom polyurethane foam swab and ordinary cotton bud under magnification.
Four-Tier Factory Standard Operating Procedures (SOPs)
To safeguard eco-solvent printheads in dry environments, print shops must replace casual maintenance with a structured four-tier protocol.
Tier 1: Morning Start-up Routine (The Pre-Wetted Wiper Method)
Never power on an eco-solvent printer and immediately execute a high-speed dry wipe. The overnight pigment residue on the wiper edge must be softened first.
- Environmental Verification: Inspect the workshop thermo-hygrometer. If ambient humidity is below 35%, activate ultrasonic mist humidifiers 20 minutes before powering up the equipment.
- Manual Wiper Rehydration: Move the carriage to the manual maintenance position. Dip a clean polyurethane foam swab into active eco-solvent cleaning solution. Gently wipe both sides of the wiper blade edge to dissolve crusted ink deposits, leaving the blade surface supple and wet.
- Cap Lip Cleaning: Wipe the raised rubber sealing lip of the i3200 capping station using a fresh solvent swab. Clear any solid debris that could break the airtight vacuum seal.
- Power Initialization & Normal Purge: Return carriage to Home position and power on the machine. Execute one normal pump clean cycle (3–5 seconds of peristaltic pump vacuum).
- Nozzle Check Pattern: Print a full 100% nozzle status test strip on test vinyl. Only begin commercial production when all 8 nozzle rows fire 100% straight without deflection.
Tier 2: Continuous Production Protocol (Firmware Flash Spits & Airflow Isolation)
During long printing shifts, air movement from ventilation systems and fast carriage scanning will rapidly desiccate exposed nozzles on non-printing channels (such as Black during a large yellow banner run).
- Hoson Board Spit Configuration: In the Hosonsoft print control software fitted to Megajet eco-solvent machines, adjust the Standby Spit Interval from the default 60 seconds down to 15–20 seconds (firing 30–50 pulses per cycle).
- Enable Margin Flash Spit: Turn on the "Spit while printing" feature. When printing banners wider than 1.6 meters where carriage transit times exceed 1.5 seconds, the printhead will fire a quick micro-burst into the side spit sponge at each margin turn. This replaces stagnant ink inside the nozzle with fresh solvent before skinning can begin.
- Airflow Deflector Shields: Position the printer away from open warehouse loading bay doors, air conditioning discharge registers, and floor circulation fans. Direct draft across the platen increases solvent evaporation by up to 300%.
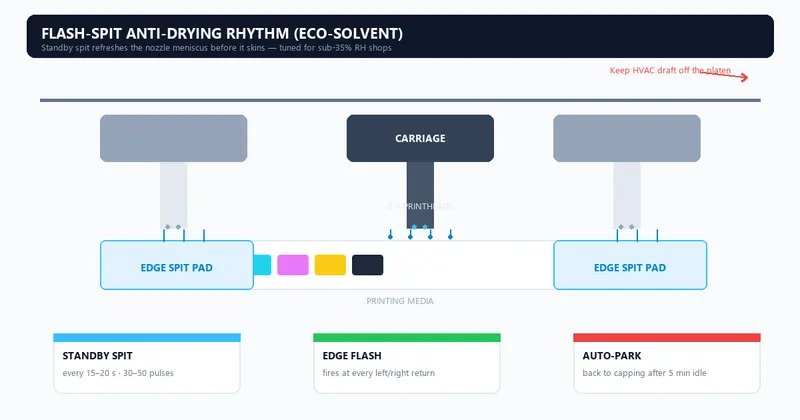
Flash-spit rhythm on the carriage: edge spit pads at both ends plus standby spit timing keep nozzles wet in dry air.
Tier 3: Evening Shutdown & Saturated Vapor Capping SOP
Overnight capping is the single most critical defense against catastrophic nozzle loss. An improperly sealed printhead sitting in dry air overnight will dry out all 3,200 nozzles by morning.
- End-of-Day Printhead Skirt Inspection: Move carriage to the maintenance station. Moisten a foam swab with eco-solvent cleaning fluid and clean the rectangular stainless steel frame surrounding the nozzle plate. Never drag the swab across the nozzle orifices themselves; wipe only the metal perimeter flange.
- Cap Sponge Moisturizing Charge: Using an eyedropper or clean 5 ml syringe, apply 3 to 5 ml of specialized Eco-Solvent Moisturizing Fluid onto the porous felt sponge inside the capping station. The sponge should be fully damp and glistening, but not flooded over the top rim.
- Carriage Lock Verification: Return the carriage to Home position. Ensure the capping station lifts and that the flexible rubber lip forms a continuous 360-degree seal against the bottom of the printhead.
- Waste Tube Pinch Clamping: If your printer is equipped with manual pinch valves on the waste ink tubes below the peristaltic pump, clamp them closed for the night. This stops gravity-induced siphon drainage from slowly pulling ink and moisturizing fluid out of the cap top while the printer is off.
- Main Power Off & Anti-Static Cover: Power down the machine using the physical switch, and cover the carriage housing with an anti-static cloth to prevent airborne dust settlement.
Tier 4: Extended Standby & Holiday Shutdown (3 to 14+ Days)
When leaving the printer idle during extended national holidays, trade shows, or factory maintenance shutdowns, follow this tiered conservation protocol:
- Short Break (3 to 7 Days): Clean the wiper and cap thoroughly. Saturate the cap sponge with low-volatility storage fluid. Lock the carriage and ensure waste tubes are tightly clamped. Power off the system completely.
- Extended Storage (Over 7 Days — Factory Longstore Protocol): Leaving active pigment ink inside micro-channels for weeks without pumping will cause resin crystallization and heavy pigment sedimentation in ink lines and dampers.
- Remove ink cartridges or sub-tank supply lines.
- Install dedicated flushing cartridges filled with Eco-Solvent Cleaning Solution.
- Execute software ink discharge routines until all CMYK lines, dampers, and nozzle chambers discharge crystal-clear solvent.
- Prime the ink path with dedicated Non-Drying Storage / Longstore Fluid.
- Seal the printhead onto the capping station with storage fluid and securely tape the cap edges for transport-grade sealing.
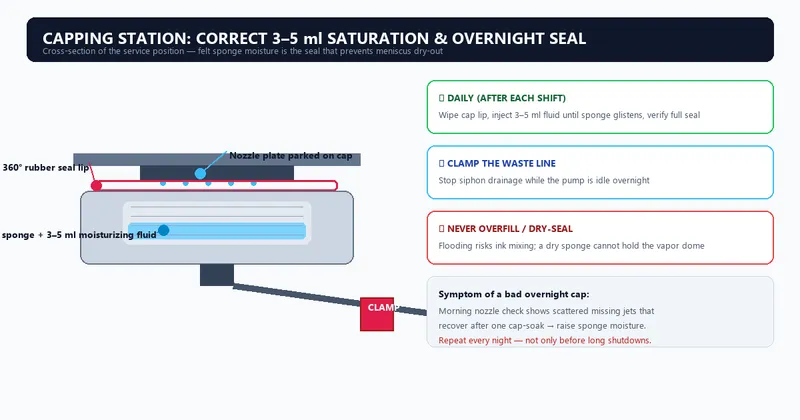
Capping station cross-section: 3–5 ml moisturizing fluid in the felt sponge, rubber seal lip, and waste-line clamp.
The Ladder of Recovery: Resolving Stubborn Micro-Crusts Without Damaging Heads
When an operator encounters missing nozzles in the morning, their immediate reflex is often to run 4 or 5 consecutive "Power Clean" cycles in the software. In a dry climate, this practice destroys printheads. A continuous power clean pulls high-vacuum negative pressure against the nozzle plate. If the nozzle orifices are partially plugged by hardened micro-crusts, the vacuum creates fluid cavitation. Air is sucked in from the margins, foaming occurs in the damper, and the rapid flow of crusted pigment particles strips away the delicate anti-wetting coating. Instead, technical teams must follow this factory-calibrated 4-step recovery ladder:
Micro-Burst Spit & Purge
5-second manual spit against waste pad + single light pump cycle to dynamic-clear viscosity.
Vapor Cap-Soaking
20-min passive soak over warm solvent cap. Ascending vapors dissolve resins with zero pump stress.
Damper Syringe Pull
Gentle backward vacuum pull with 20ml syringe. Strictly zero forward manual pushing.
Shallow Bench Dish
1.0 mm immersion of metal nozzle face only. All electronics, boards, and cables stay 100% dry.
*Strict Warning:* **NEVER press forward with a syringe.** Applying manual positive pressure into an Epson micro-piezo manifold will instantly rupture the internal fluid separation membranes, destroying the printhead beyond repair. 4. **Step 4: Shallow Bench Immersion (Last Resort).** If nozzles remain plugged by hardened resins, unmount the head and place it in a shallow glass dish containing active cleaning solution. The liquid level must **never exceed 1.0 mm**, submerging only the stainless steel nozzle plate while keeping all green PCB circuit boards and cable terminals completely dry. Soak for no more than 30 minutes before testing. ## Diagnostic Checklist: Distinguishing Fluid Dry-Out From Mechanical Failure
Not all nozzle defects stem from dried ink. Use this diagnostic table to determine whether an issue is caused by dry-climate evaporation or physical component failure:
| Visual Symptom on Test Pattern | Likely Root Cause | Diagnostic Confirmation Test | Correct Remedial Action |
|---|---|---|---|
| Scattered, random missing nozzles across all colors | Meniscus micro-skinning due to dry air exposure | Nozzle test recovers immediately after a 15-minute cap soak | Increase standby flash frequency; raise room humidity to >45% |
| A solid block of 100+ adjacent nozzles missing in one channel | Damper filter mesh clog or air starvation in ink line | Damper body is hollow or fails to refill during pump purge | Replace the ink damper; inspect tubing joints for vacuum air leaks |
| Nozzles fire, but lines deflect sideways creating fuzzy edges | Wiper blade dried and hardened; fluorine surface coating abraded | Deflection persists across exact same nozzles even after full flush | Replace wiper immediately; apply wet-wiper SOP to protect remaining channels |
| Missing nozzles drop out only after 5+ minutes of continuous printing | Static electricity buildup pulling airborne dust, or insufficient sub-tank feed rate | Sub-tank ink level drops; media clings statically to metal guide plates | Install active anti-static ionizer bars; inspect primary ink feed pumps |
Technical Summary & Direct Engineering Support
Operating eco-solvent equipment in arid conditions requires trading aggressive brute-force cleans for disciplined preventive chemistry:
- Maintain the Environment: Invest in commercial ultrasonic humidification to maintain room RH between 40% and 55%. This single intervention eliminates 70% of morning clogging problems.
- Never Dry Wipe: Keep wiper blades lubricated with active cleaning fluid; never allow a dry, crusted blade to abrade the PrecisionCore fluorine faceplate.
- Seal With Precision: Use specialized slow-evaporating moisturizing fluid on cap sponges every evening, and verify an airtight 360-degree seal before leaving the shop.
Optimize Your Production Parameters with Megajet Engineers
Are you experiencing recurring nozzle deflection, premature head degradation, or print banding in low-humidity production environments? Share your current workshop temperature, humidity levels, and board configuration with our engineering team. We will provide optimized Hoson flash-firing profiles, verified capping fluid specifications, or arrange blank substrate ink adhesion test reports directly from our manufacturing facility.